ExploraBI Automation Tutorial — Learn How to Automate Your Google Sheets

Tutorial Section

This section provides step-by-step tutorials for common automation scenarios, organized from beginner to advanced levels. Each tutorial includes detailed instructions and image placeholders to guide you through the process.

Getting Started

Before starting any tutorial, make sure you have:

  1. Installed the ExploraBI Automation add-on in your Google Sheet
  2. Opened the sidebar by clicking “Extensions” → “ExploraBI Automation” → “⚙️ ExploraBI Automation”

[IMAGE PLACEHOLDER: Getting Started - Opening the Sidebar] Description: Screenshot showing the Google Sheets Extensions menu with the ExploraBI Automation option highlighted Footer: 
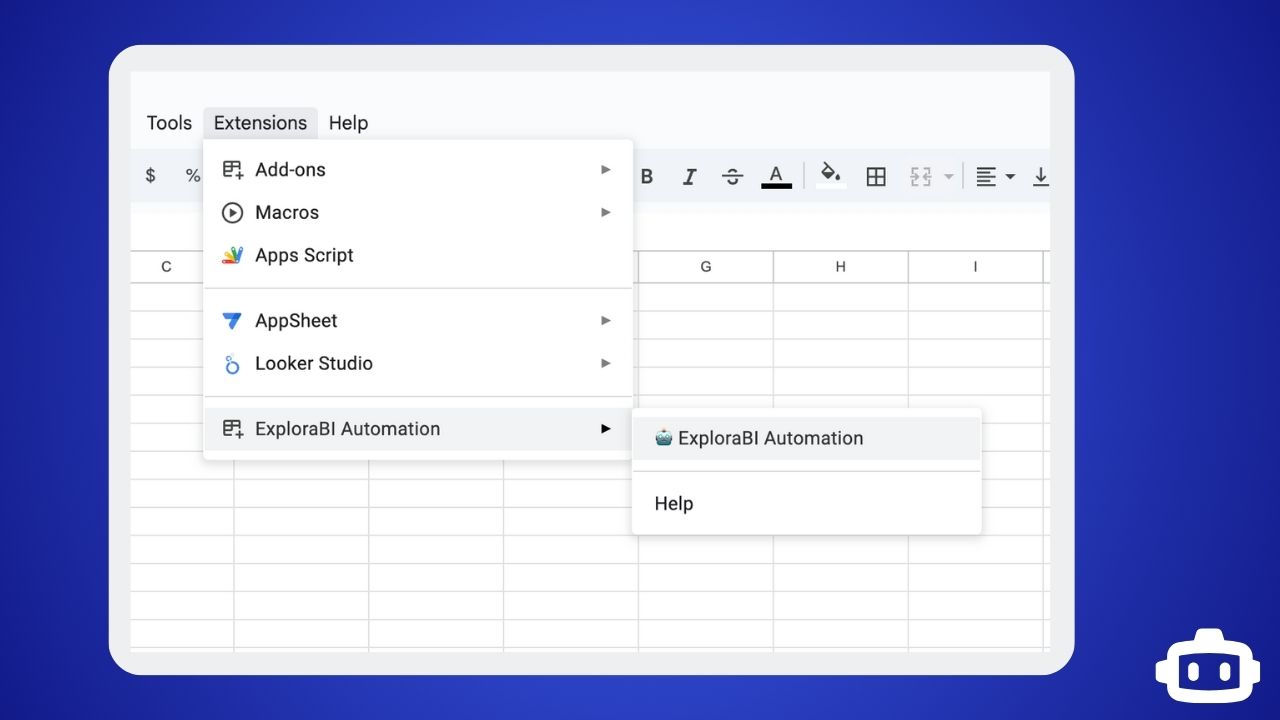
Opening the ExploraBI Automation sidebar from the Extensions menu

Beginner Tutorials

Tutorial 1: Auto-Timestamp When Data is Entered

Goal: Automatically add a timestamp in column B whenever data is entered in column A.

Setup:

  1. Open a new Google Sheet
  2. Add headers: “Data Entry” in A1, “Timestamp” in B1

[IMAGE PLACEHOLDER: Tutorial 1 Setup - Sheet Headers] Description: Screenshot of a Google Sheet with “Data Entry” in cell A1 and “Timestamp” in cell B1 Footer: Setting up the basic sheet structure with headers

Steps:

  1. Open ExploraBI Automation Sidebar
    • Click the sidebar icon to open the automation panel

[IMAGE PLACEHOLDER: Tutorial 1 Step 1 - Sidebar Overview] Description: Screenshot of the ExploraBI Automation sidebar showing the main interface with “Automations” tab selected Footer: The main ExploraBI Automation sidebar interface

  1. Create New Automation
    • Click the ”➕ New Automation” button
    • Choose “Create from Scratch” option

[IMAGE PLACEHOLDER: Tutorial 1 Step 2 - New Automation Button] Description: Screenshot showing the ”➕ New Automation” button highlighted in the sidebar Footer: Starting a new automation from the main interface

[IMAGE PLACEHOLDER: Tutorial 1 Step 2b - Template Selection] Description: Screenshot of the template selection screen with “Create from Scratch” option highlighted Footer: 
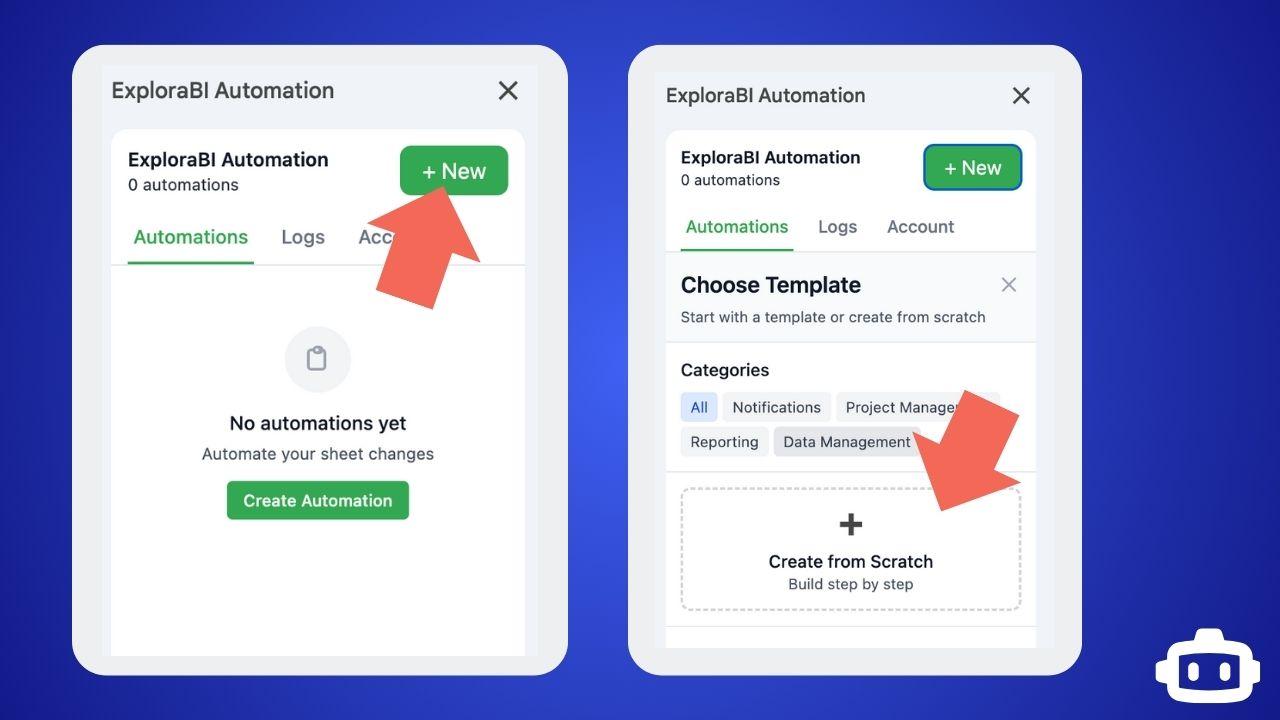
Choosing to create a custom automation from scratch

  1. Configure Basic Settings
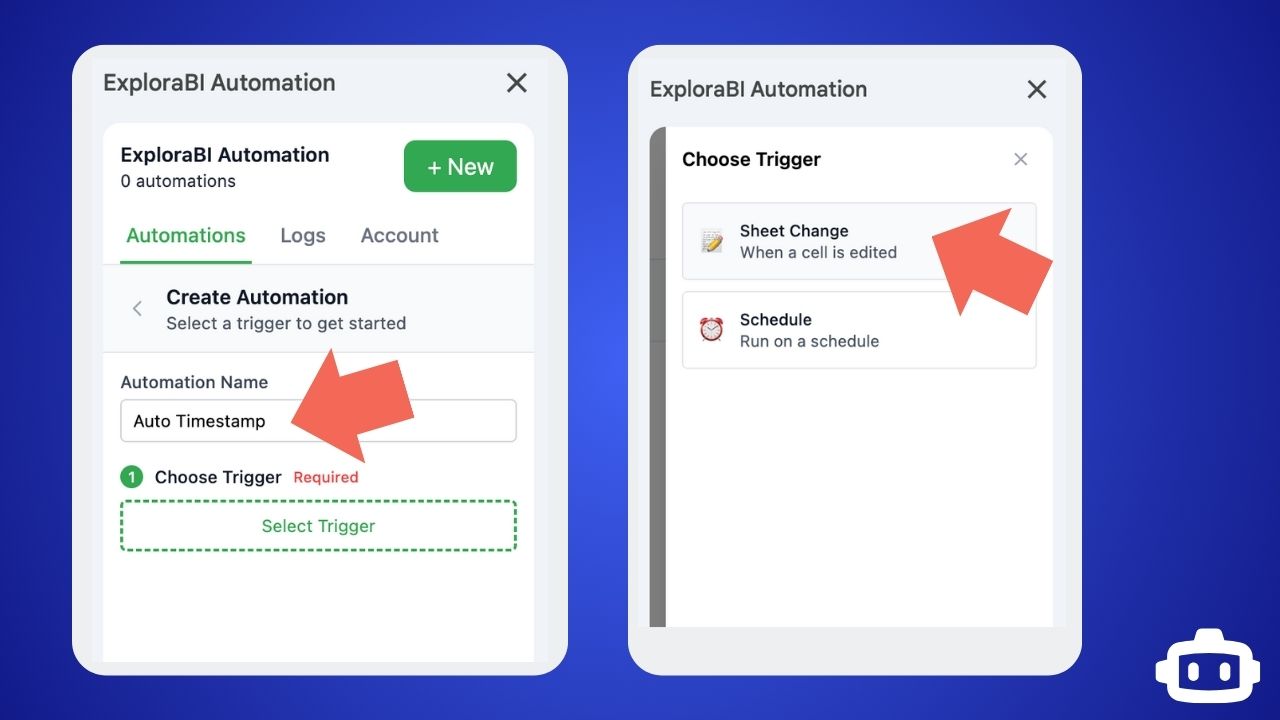
    • Enter automation name: “Auto Timestamp”
    • Ensure “Active” toggle is ON

[IMAGE PLACEHOLDER: Tutorial 1 Step 3 - Basic Settings] Description: Screenshot of the automation creation form with “Auto Timestamp” entered as the name and Active toggle enabled Footer: Setting up basic automation details and ensuring it’s active

  1. Add Sheet Change Trigger
    • Click “Choose Trigger” button
    • Select ”📝 Sheet Change” from the trigger options

[IMAGE PLACEHOLDER: Tutorial 1 Step 4 - Choose Trigger] Description: Screenshot of the trigger selection modal with ”📝 Sheet Change” option highlighted Footer: Selecting the Sheet Change trigger for data entry detection

  1. Configure Trigger Settings
    • Click the ⚙️ configuration icon next to the trigger
    • Set “Cell Range” to “A:A” (to monitor column A)
    • Leave “Sheet Name” empty (for current sheet)
    • Set “Change Type” to “Any change”
    • Click “Save”

[IMAGE PLACEHOLDER: Tutorial 1 Step 5 - Trigger Configuration] Description: Screenshot of the trigger configuration modal with Cell Range set to “A:A” and Change Type set to “Any change” Footer: 
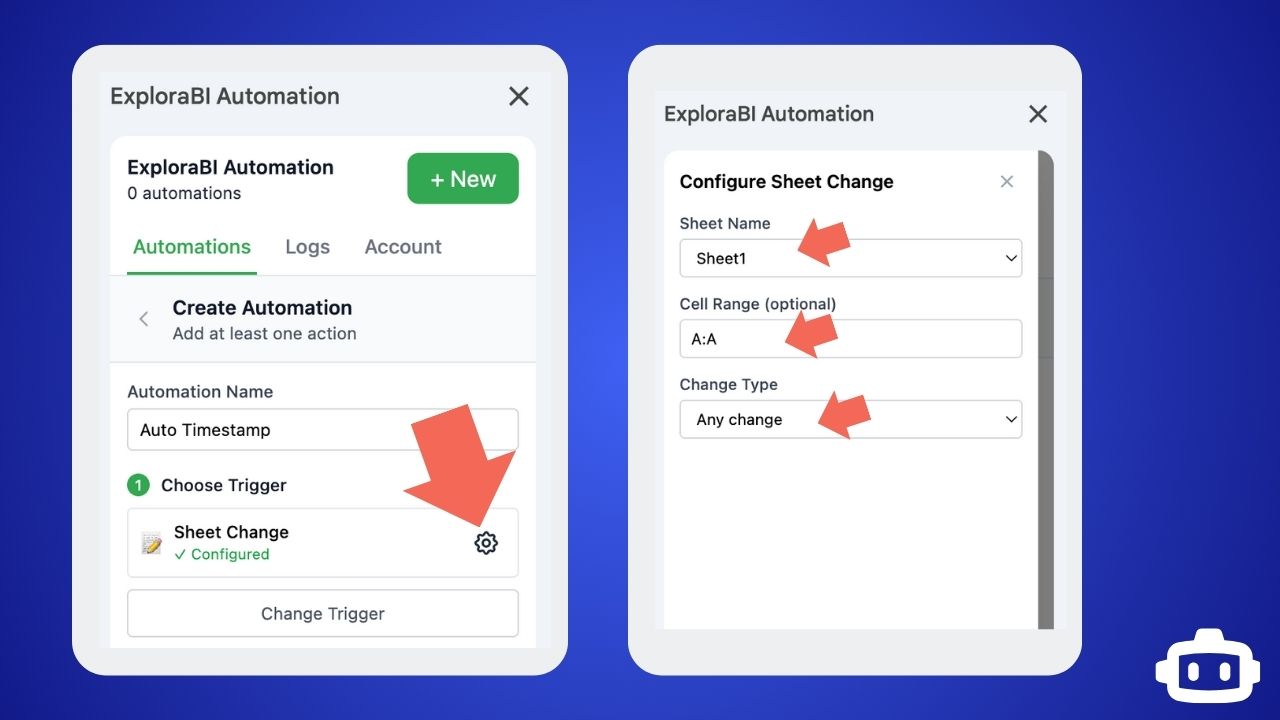
Configuring the trigger to monitor changes in column A

  1. Add Update Cell Action
    • Click ”➕ Add Action” button
    • Select “✏️ Update Cell” from the action options

[IMAGE PLACEHOLDER: Tutorial 1 Step 6 - Add Action] Description: Screenshot of the action selection modal with “✏️ Update Cell” option highlighted Footer: 
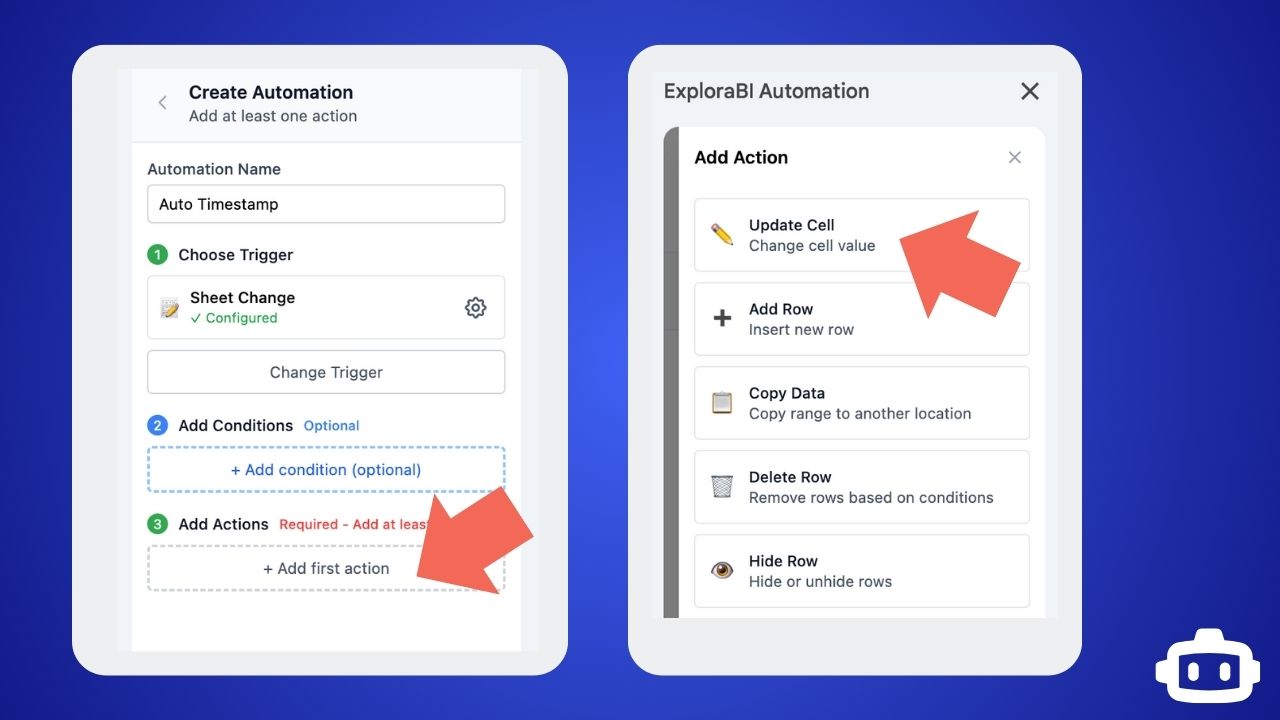
Adding an Update Cell action to the automation

  1. Configure Update Cell Action
    • Click the ⚙️ configuration icon next to the action
    • Set “Cell Reference” to “B{{row_number}}”
    • Set “New Value” to “{{NOW}}”
    • Select your sheet name from “Sheet Name” dropdown
    • Click “Save”

[IMAGE PLACEHOLDER: Tutorial 1 Step 7 - Action Configuration] Description: Screenshot of the Update Cell action configuration with Cell Reference “B{{row_number}}” and New Value “{{NOW}}” Footer: 
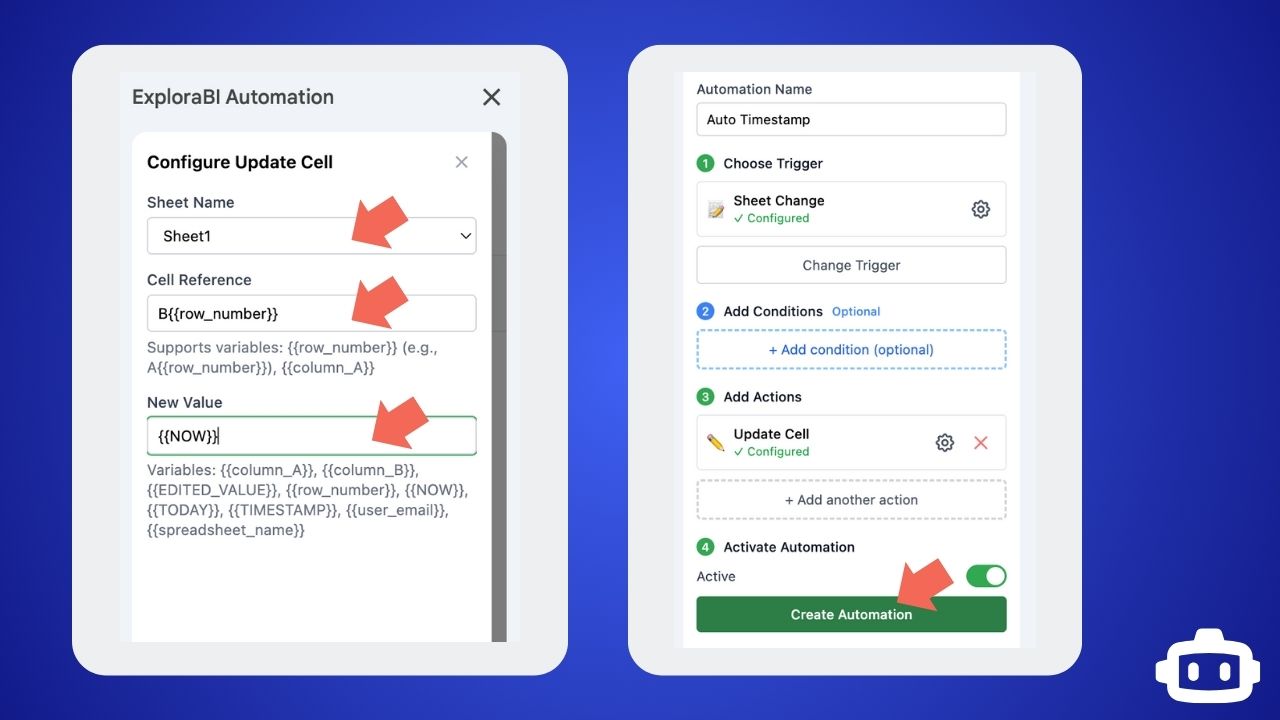
Configuring the action to insert timestamps in column B

  1. Save and Test
    • Click ”💾 Save Automation” button
    • Enter test data in column A2, A3, etc.
    • Watch column B automatically populate with timestamps

[IMAGE PLACEHOLDER: Tutorial 1 Step 8 - Final Result] Description: Screenshot showing the completed automation working with test data in column A and automatic timestamps in column B Footer: 
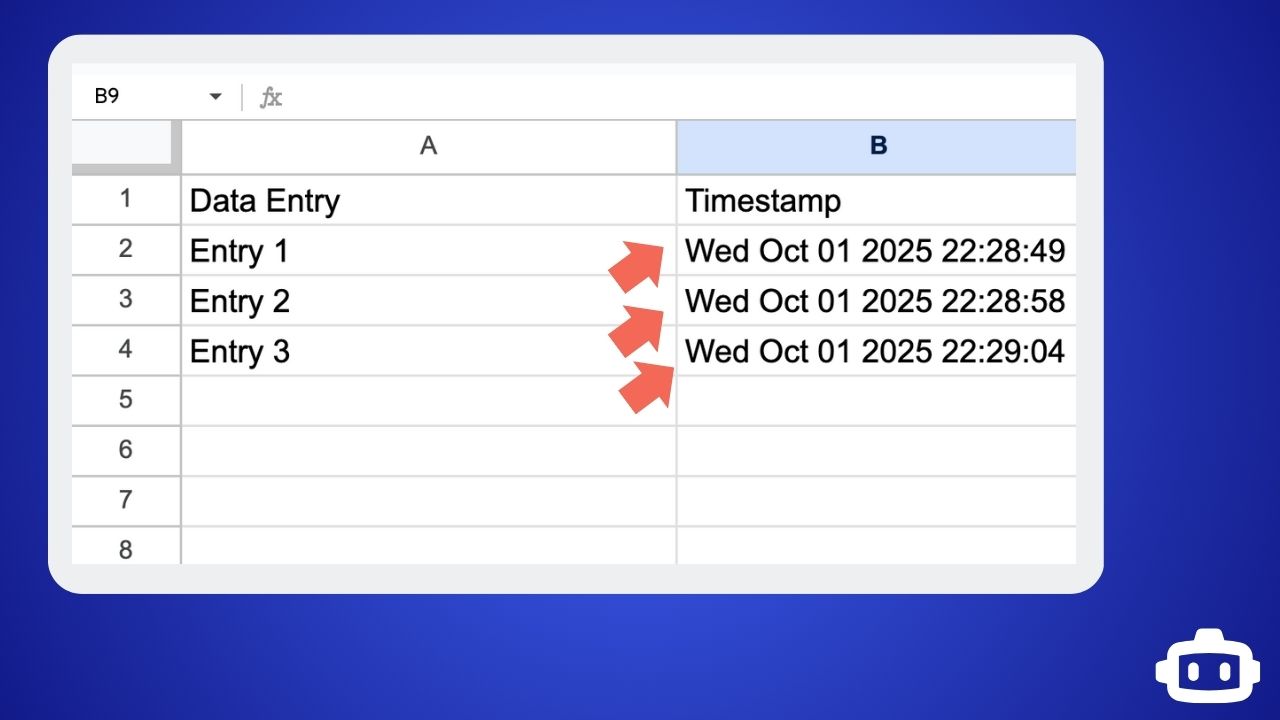
The completed auto-timestamp automation in action


Tutorial 2: Send Email Notification on New Entry

Goal: Send an email notification when new data is added to your sheet.

Setup:

  1. Create a sheet with headers: “Name”, “Email”, “Message”, “Date”
  2. Add a few sample rows

[IMAGE PLACEHOLDER: Tutorial 2 Setup - Sample Data] Description: Screenshot of a Google Sheet with headers “Name”, “Email”, “Message”, “Date” and some sample data rows Footer: Setting up a contact form data sheet with sample entries

Steps:

  1. Create New Automation
    • Click ”➕ New Automation”
    • Choose “Email Notification on Edit” template OR create from scratch
    • Name: “New Entry Email Alert”

[IMAGE PLACEHOLDER: Tutorial 2 Step 1 - Template Selection] Description: Screenshot showing the “Email Notification on Edit” template highlighted in the template gallery Footer: Selecting the email notification template for quick setup

  1. Configure Email Permissions (if needed)
    • If prompted, click ”🔐 Setup Email Permissions”
    • Follow the authorization process to enable email sending

[IMAGE PLACEHOLDER: Tutorial 2 Step 2 - Email Permissions] Description: Screenshot of the email permissions setup dialog with ”🔐 Setup Email Permissions” button Footer: Setting up email permissions for automation notifications

  1. Configure Trigger
    • Use ”📝 Sheet Change” trigger
    • Set “Cell Range” to “A:D” (monitor all data columns)
    • Set “Change Type” to “Any change”

[IMAGE PLACEHOLDER: Tutorial 2 Step 3 - Trigger Range] Description: Screenshot of trigger configuration with Cell Range set to “A:D” to monitor all data columns Footer: Configuring the trigger to monitor all data entry columns

  1. Add Condition (Optional)
    • Click ”➕ Add Condition”
    • Select ”📊 Column Value” condition
    • Set “Column” to “A”
    • Set “Operator” to “Is not empty”
    • This ensures emails only send when there’s actual data

[IMAGE PLACEHOLDER: Tutorial 2 Step 4 - Add Condition] Description: Screenshot of adding a Column Value condition to check if column A is not empty Footer: Adding a condition to ensure emails only send for valid entries

  1. Configure Email Action
    • The template includes a ”📧 Send Email” action
    • Configure the email settings:
      • To: “[email protected]” (replace with your email)
      • Subject: “New Entry: {{column_A}}”
      • Body: “New entry received:\n\nName: {{column_A}}\nEmail: {{column_B}}\nMessage: {{column_C}}\nTime: {{NOW}}”

[IMAGE PLACEHOLDER: Tutorial 2 Step 5 - Email Configuration] Description: Screenshot of the email action configuration form with recipient, subject, and body fields filled out Footer: Configuring the email content with dynamic placeholders

  1. Test the Automation
    • Save the automation
    • Add a new row with data
    • Check your email for the notification

[IMAGE PLACEHOLDER: Tutorial 2 Step 6 - Email Received] Description: Screenshot of the email notification received with the automated content Footer: Example of the automated email notification received


Tutorial 3: Task Completion with Checkbox Tracking

Goal: Automatically update a completion date when a task checkbox is checked.

Setup:

  1. Create columns: “Task” (A), “Complete” (B - checkbox), “Completion Date” (C)
  2. Insert checkboxes in column B (Insert → Checkbox)

[IMAGE PLACEHOLDER: Tutorial 3 Setup - Checkbox Column] Description: Screenshot showing how to insert checkboxes in column B using Insert → Checkbox menu Footer: Adding checkboxes to track task completion status

Steps:

  1. Create New Automation

    • Name: “Task Completion Tracker”
    • Use ”📝 Sheet Change” trigger
    • Set “Cell Range” to “B:B” (checkbox column)
  2. Add Checkbox Condition

    • Click ”➕ Add Condition”
    • Select “☑️ Checkbox” condition
    • Set “Column” to “B”
    • Set “Expected Value” to “Checked”

[IMAGE PLACEHOLDER: Tutorial 3 Step 2 - Checkbox Condition] Description: Screenshot of the checkbox condition configuration with Column B and “Checked” selected Footer: Setting up a condition to detect when checkboxes are checked

  1. Add Update Cell Action
    • Add “✏️ Update Cell” action
    • Set “Cell Reference” to “C{{row_number}}”
    • Set “New Value” to “{{TODAY}}”

[IMAGE PLACEHOLDER: Tutorial 3 Step 3 - Completion Date] Description: Screenshot showing the Update Cell action configured to insert today’s date in column C Footer: Configuring automatic completion date insertion

  1. Test and Verify
    • Check various task checkboxes
    • Verify completion dates appear automatically

[IMAGE PLACEHOLDER: Tutorial 3 Step 4 - Working Result] Description: Screenshot showing completed tasks with checkboxes checked and completion dates automatically filled Footer: The completed task tracking automation in action


Tutorial 4: Copy Important Data to Backup Sheet

Goal: Automatically copy completed tasks from a “Tasks” sheet to a “Completed” sheet.

Setup:

  1. Create two sheets: “Tasks” and “Completed”
  2. In “Tasks” sheet, add headers: “Task”, “Assigned To”, “Status”, “Date”
  3. In “Completed” sheet, add the same headers

[IMAGE PLACEHOLDER: Tutorial 4 Setup - Two Sheets] Description: Screenshot showing both “Tasks” and “Completed” sheet tabs at the bottom of the Google Sheet Footer: Setting up separate sheets for active and completed tasks

Steps:

  1. Create Automation

    • Name: “Copy Completed Tasks”
    • Use ”📝 Sheet Change” trigger
    • Set “Sheet Name” to “Tasks”
    • Set “Cell Range” to “C:C” (Status column)
  2. Add Status Condition

    • Add ”📊 Column Value” condition
    • Set “Column” to “C”
    • Set “Operator” to “Equals”
    • Set “Value” to “Complete”

[IMAGE PLACEHOLDER: Tutorial 4 Step 2 - Status Condition] Description: Screenshot of the condition configuration checking if Status column equals “Complete” Footer: Setting up a condition to detect completed tasks

  1. Add Copy Data Action
    • Click ”➕ Add Action”
    • Select ”📋 Copy Data”
    • Configure settings:
      • Source Range: “A{{row_number}}:D{{row_number}}”
      • Source Sheet: “Tasks”
      • Destination Range: “A:D”
      • Destination Sheet: “Completed”

[IMAGE PLACEHOLDER: Tutorial 4 Step 3 - Copy Configuration] Description: Screenshot of the Copy Data action configuration with source and destination settings Footer: Configuring the data copy operation between sheets

  1. Test the Automation
    • Change a task status to “Complete”
    • Check that the entire row appears in the “Completed” sheet

[IMAGE PLACEHOLDER: Tutorial 4 Step 4 - Copied Data] Description: Screenshot showing a completed task row that has been copied to the Completed sheet Footer: Verification that the task data was successfully copied


Tutorial 5: Schedule Daily Summary Reports

Goal: Automatically generate and email a daily summary report at 9 AM.

Setup:

  1. Create a sheet with data you want to summarize
  2. Add summary formulas in designated cells (e.g., F1, F2, F3)

[IMAGE PLACEHOLDER: Tutorial 5 Setup - Summary Formulas] Description: Screenshot showing summary formulas like =COUNTA(), =SUM(), etc. in cells F1-F3 Footer: Setting up summary formulas for the daily report

Steps:

  1. Create Scheduled Automation
    • Name: “Daily Summary Report”
    • Choose ”⏰ Schedule” trigger

[IMAGE PLACEHOLDER: Tutorial 5 Step 1 - Schedule Trigger] Description: Screenshot of selecting the ”⏰ Schedule” trigger from the trigger options Footer: Choosing a schedule trigger for automated daily reports

  1. Configure Schedule Settings
    • Set “Frequency” to “Daily”
    • Set “Time” to “9:00 AM”
    • Click “Save”

[IMAGE PLACEHOLDER: Tutorial 5 Step 2 - Schedule Configuration] Description: Screenshot of the schedule configuration with Daily frequency and 9:00 AM time selected Footer: Setting up the daily schedule for 9 AM execution

  1. Add Email Action
    • Add ”📧 Send Email” action
    • Configure email:
      • To: “[email protected]
      • Subject: “Daily Report - {{TODAY}}”
      • Body: “Daily Summary for {{TODAY}}:\n\nTotal Records: {{range_F1}}\nSum: {{range_F2}}\nAverage: {{range_F3}}\n\nGenerated automatically at {{NOW}}”

[IMAGE PLACEHOLDER: Tutorial 5 Step 3 - Daily Email Config] Description: Screenshot of the email configuration with dynamic placeholders for report data Footer: Configuring the daily report email with dynamic content

  1. Test and Monitor
    • Save the automation
    • The automation will run daily at 9 AM
    • For testing, temporarily change the time to a few minutes from now

[IMAGE PLACEHOLDER: Tutorial 5 Step 4 - Received Report] Description: Screenshot of the received daily report email with actual data values Footer: Example of the automated daily summary report email

Intermediate Tutorials

Tutorial 6: Conditional Formatting Based on Priority

Goal: Automatically highlight high-priority tasks in red, medium in yellow, and low in green.

Setup:

  1. Create a task list with columns: “Task”, “Priority”, “Status”, “Due Date”
  2. Add tasks with priorities: “High”, “Medium”, “Low”

[IMAGE PLACEHOLDER: Tutorial 6 Setup - Priority Data] Description: Screenshot of a task sheet with Priority column containing High, Medium, and Low values Footer: Setting up a task list with different priority levels

Steps:

  1. Create High Priority Automation

    • Name: “High Priority Formatting”
    • Use ”📝 Sheet Change” trigger for “Priority” column (B:B)
  2. Add Priority Condition

    • Add ”📊 Column Value” condition
    • Set “Column” to “B”, “Operator” to “Equals”, “Value” to “High”
  3. Add Conditional Formatting Action

    • Add ”🎨 Conditional Formatting” action
    • Configure formatting:
      • Format Range: “A{{row_number}}:D{{row_number}}”
      • Condition Type: “Value equals”
      • Condition Value: “High”
      • Background Color: Red (#ff0000)
      • Text Color: White (#ffffff)
      • Bold: Checked

[IMAGE PLACEHOLDER: Tutorial 6 Step 3 - Formatting Config] Description: Screenshot of the conditional formatting action configuration with red background and white text settings Footer: Configuring red highlighting for high-priority tasks

  1. Create Additional Automations
    • Repeat for “Medium” priority (yellow background)
    • Repeat for “Low” priority (green background)

[IMAGE PLACEHOLDER: Tutorial 6 Step 4 - Color Results] Description: Screenshot showing tasks highlighted in different colors based on their priority levels Footer: The completed priority-based color coding system in action


Tutorial 7: Multi-Condition Logic with AND/OR

Goal: Create an automation that triggers only when multiple conditions are met using AND/OR logic.

Setup:

  1. Create an expense sheet: “Date”, “Category”, “Amount”, “Status”
  2. Add sample expenses with various categories and amounts

[IMAGE PLACEHOLDER: Tutorial 7 Setup - Expense Data] Description: Screenshot of an expense tracking sheet with Date, Category, Amount, and Status columns Footer: Setting up an expense tracking sheet for multi-condition automation

Steps:

  1. Create Complex Automation

    • Name: “High Expense Alert”
    • Use ”📝 Sheet Change” trigger for “Amount” column
  2. Configure Multiple Conditions

    • Set “Condition Logic” to “All conditions must be met (AND)”
    • Add first condition: ”📊 Column Value”
      • Column: “C”, Operator: “Greater than”, Value: “1000”
    • Add second condition: ”📊 Column Value”
      • Column: “B”, Operator: “Equals”, Value: “Travel”

[IMAGE PLACEHOLDER: Tutorial 7 Step 2 - Multiple Conditions] Description: Screenshot showing two conditions with AND logic - amount > 1000 AND category = Travel Footer: Setting up multiple conditions with AND logic for expense alerts

  1. Add Email Alert Action
    • Add ”📧 Send Email” action
    • Configure alert email:
      • To: “[email protected]
      • Subject: “High Travel Expense Alert”
      • Body: “High travel expense detected:\n\nAmount: ${{column_C}}\nCategory: {{column_B}}\nDate: {{column_A}}\n\nRequires approval.”

[IMAGE PLACEHOLDER: Tutorial 7 Step 3 - Alert Email] Description: Screenshot of the email configuration for high expense alerts Footer: Configuring email alerts for high-value travel expenses

  1. Test with OR Logic (Alternative)
    • Create another automation with “Any condition can be met (OR)”
    • Add conditions for different scenarios that should trigger alerts

[IMAGE PLACEHOLDER: Tutorial 7 Step 4 - OR Logic] Description: Screenshot showing the condition logic toggle set to “Any condition can be met (OR)” Footer: Example of using OR logic for alternative triggering conditions


Tutorial 8: Automatic Row Deletion with Safety Checks

Goal: Automatically delete completed tasks that are older than 30 days, with safety limits.

Setup:

  1. Create a task sheet: “Task”, “Status”, “Completion Date”
  2. Add tasks with various completion dates, some older than 30 days

[IMAGE PLACEHOLDER: Tutorial 8 Setup - Old Completed Tasks] Description: Screenshot showing tasks with completion dates, some older than 30 days Footer: Setting up test data with old completed tasks for cleanup

Steps:

  1. Create Scheduled Cleanup

    • Name: “Weekly Task Cleanup”
    • Use ”⏰ Schedule” trigger
    • Set to “Weekly” on “Sunday” at “12:00 AM”
  2. Add Multiple Conditions

    • Set condition logic to “All conditions must be met (AND)”
    • First condition: ”📊 Column Value”
      • Column: “B”, Operator: “Equals”, Value: “Completed”
    • Second condition: ”📊 Column Value”
      • Column: “C”, Operator: “Less than”, Value: ”={{TODAY()-30}}”

[IMAGE PLACEHOLDER: Tutorial 8 Step 2 - Date Conditions] Description: Screenshot showing conditions for completed status and date older than 30 days Footer: Setting up conditions to identify old completed tasks

  1. Add Delete Row Action
    • Add “🗑️ Delete Row” action
    • Configure settings:
      • Delete Mode: “Rows matching condition”
      • Condition Column: “B”
      • Operator: “Equals”
      • Value: “Completed”

[IMAGE PLACEHOLDER: Tutorial 8 Step 3 - Delete Configuration] Description: Screenshot of the Delete Row action configuration with condition-based deletion settings Footer: Configuring safe deletion of rows matching specific conditions

  1. Safety Testing
    • ⚠️ Important: Test with sample data first
    • Use a copy of your sheet for initial testing
    • Monitor the logs to verify correct operation

[IMAGE PLACEHOLDER: Tutorial 8 Step 4 - Safety Warning] Description: Screenshot showing a warning message about testing deletion automations safely Footer: Important safety reminder for testing deletion automations


Tutorial 9: Smart Sheet Sorting on Data Changes

Goal: Keep a leaderboard automatically sorted by score, with secondary sorting by name.

Setup:

  1. Create a leaderboard: “Player Name”, “Score”, “Date Achieved”
  2. Add sample players with various scores

[IMAGE PLACEHOLDER: Tutorial 9 Setup - Leaderboard Data] Description: Screenshot of a leaderboard with player names, scores, and dates in unsorted order Footer: Setting up an unsorted leaderboard for automatic sorting

Steps:

  1. Create Sort Automation

    • Name: “Auto-Sort Leaderboard”
    • Use ”📝 Sheet Change” trigger for “Score” column (B:B)
  2. Add Sort Sheet Action

    • Add ”🔽 Sort Sheet” action
    • Configure sorting:
      • Sort Range: “A2:C” (excluding headers)
      • Primary Sort Column: “B”
      • Primary Sort Order: “Descending” (highest scores first)
      • Secondary Sort Column: “A”
      • Secondary Sort Order: “Ascending” (alphabetical names)

[IMAGE PLACEHOLDER: Tutorial 9 Step 2 - Sort Configuration] Description: Screenshot of the sort action configuration with primary and secondary sort settings Footer: Configuring multi-level sorting for the leaderboard

  1. Test the Sorting
    • Update any score value
    • Watch the sheet automatically re-sort
    • Verify highest scores appear at the top

[IMAGE PLACEHOLDER: Tutorial 9 Step 3 - Sorted Result] Description: Screenshot showing the leaderboard automatically sorted with highest scores at the top Footer: The automatically sorted leaderboard in action


Tutorial 10: Dynamic Row Visibility Based on Status

Goal: Automatically hide completed tasks but keep them in the sheet for record-keeping.

Setup:

  1. Create a task sheet: “Task”, “Assignee”, “Status”, “Priority”
  2. Add tasks with various statuses including “Completed”

[IMAGE PLACEHOLDER: Tutorial 10 Setup - Mixed Status Tasks] Description: Screenshot showing tasks with different statuses including some marked as “Completed” Footer: Setting up a task list with mixed completion statuses

Steps:

  1. Create Hide Automation

    • Name: “Hide Completed Tasks”
    • Use ”📝 Sheet Change” trigger for “Status” column (C:C)
  2. Add Status Condition

    • Add ”📊 Column Value” condition
    • Set Column: “C”, Operator: “Equals”, Value: “Completed”
  3. Add Hide Row Action

    • Add “👁️ Hide Row” action
    • Configure settings:
      • Hide Mode: “Rows matching condition”
      • Action: “Hide rows”
      • Condition Column: “C”
      • Operator: “Equals”
      • Value: “Completed”

[IMAGE PLACEHOLDER: Tutorial 10 Step 3 - Hide Configuration] Description: Screenshot of the Hide Row action configuration with condition-based hiding settings Footer: Configuring automatic hiding of completed tasks

  1. Create Unhide Automation (Optional)
    • Create a second automation to unhide tasks when status changes back
    • Use “Not equals” condition with “Completed”
    • Set action to “Unhide rows”

[IMAGE PLACEHOLDER: Tutorial 10 Step 4 - Hidden Rows] Description: Screenshot showing the sheet with completed tasks hidden (gaps in row numbers visible) Footer: Result showing completed tasks are now hidden from view

Advanced Tutorials

Tutorial 11: Comprehensive Order Processing System

Goal: Create a multi-step workflow that processes orders, updates inventory, sends notifications, and generates reports.

Setup:

  1. Create “Orders” sheet: “Order ID”, “Product”, “Quantity”, “Customer Email”, “Status”
  2. Create “Inventory” sheet: “Product”, “Stock Level”, “Reorder Point”
  3. Create “Reports” sheet: “Order ID”, “Product”, “Quantity”, “Process Date”

[IMAGE PLACEHOLDER: Tutorial 11 Setup - Multi Sheet System] Description: Screenshot showing three sheet tabs - Orders, Inventory, and Reports Footer: Setting up a multi-sheet order processing system

Steps:

  1. Create Master Automation

    • Name: “Order Processing System”
    • Use ”📝 Sheet Change” trigger
    • Monitor “Status” column in “Orders” sheet
  2. Add Processing Condition

    • Add condition: Status = “Shipped”
  3. Add Multiple Actions in Sequence

    Action 1: Update Inventory

    • Add “✏️ Update Cell” action
    • Use formula to decrease inventory based on order quantity
    • Target inventory sheet cells

    Action 2: Customer Notification

    • Add ”📧 Send Email” action
    • Send to customer email from order row
    • Include order details and tracking info

    Action 3: Generate Report Entry

    • Add ”➕ Add Row” action
    • Copy order data to Reports sheet with process timestamp

[IMAGE PLACEHOLDER: Tutorial 11 Step 3 - Multiple Actions] Description: Screenshot showing three actions configured in sequence within one automation Footer: Setting up multiple coordinated actions in a single automation

  1. Test End-to-End Process
    • Change an order status to “Shipped”
    • Verify inventory updates, email sends, and report generates

[IMAGE PLACEHOLDER: Tutorial 11 Step 4 - Process Complete] Description: Screenshot showing the completed order processing with updated inventory and new report entry Footer: The complete order processing automation in action


Tutorial 12: External API Integration with Webhooks

Goal: Send order data to an external fulfillment system when orders are placed.

Setup:

  1. Create an orders sheet
  2. Get a webhook URL from your external system (use webhook.site for testing)

[IMAGE PLACEHOLDER: Tutorial 12 Setup - Webhook URL] Description: Screenshot of webhook.site showing a unique webhook URL for testing Footer: Setting up a test webhook URL for external integration

Steps:

  1. Create Webhook Integration

    • Name: “Order Fulfillment Webhook”
    • Use ”📝 Sheet Change” trigger for new orders
  2. Add Order Condition

    • Add condition to detect new orders (e.g., Order ID not empty)
  3. Configure Webhook Action

    • Add ”🔗 Send Webhook” action
    • Set webhook URL from your external service
    • Configure JSON payload:
      {
      "order_id": "{{column_A}}",
      "product": "{{column_B}}",
      "quantity": "{{column_C}}",
      "customer_email": "{{column_D}}",
      "timestamp": "{{NOW}}",
      "source": "Google Sheets Automation"
      

    }

[IMAGE PLACEHOLDER: Tutorial 12 Step 3 - Webhook Config] Description: Screenshot of the webhook action configuration with JSON payload visible Footer: Configuring webhook integration with dynamic JSON payload

  1. Test Integration
    • Add a new order to the sheet
    • Check webhook.site to see the received data
    • Verify all dynamic values are properly substituted

[IMAGE PLACEHOLDER: Tutorial 12 Step 4 - Webhook Received] Description: Screenshot of webhook.site showing the received webhook data with order information Footer: Verification that the webhook was successfully sent and received


Tutorial 13: Advanced HTTP API Integration

Goal: Look up product information from an external API and populate sheet data automatically.

Setup:

  1. Create a product sheet: “SKU”, “Product Name”, “Price”, “Description”
  2. Have an API endpoint that returns product data (use a mock API for testing)

[IMAGE PLACEHOLDER: Tutorial 13 Setup - Product Sheet] Description: Screenshot of a product sheet with SKU column filled but other columns empty Footer: Setting up a product sheet for API data population

Steps:

  1. Create API Lookup Automation

    • Name: “Product Info Lookup”
    • Use ”📝 Sheet Change” trigger for “SKU” column
  2. Add SKU Condition

    • Add condition: SKU column is not empty
  3. Configure HTTP Request Action

    • Add ”🌐 HTTP Request” action
    • Configure API call:

[IMAGE PLACEHOLDER: Tutorial 13 Step 3 - HTTP Config] Description: Screenshot of the HTTP Request action configuration with API URL and headers Footer: Configuring HTTP API request with dynamic SKU parameter

  1. Add Data Population Actions
    • Add multiple “✏️ Update Cell” actions to populate:
      • Product Name from API response
      • Price from API response
      • Description from API response

[IMAGE PLACEHOLDER: Tutorial 13 Step 4 - API Response] Description: Screenshot showing the sheet with product information automatically populated from API Footer: Product data automatically populated from external API lookup


Tutorial 14: Complex Conditional Logic with Nested Scenarios

Goal: Create a sophisticated approval workflow with multiple decision points and escalation paths.

Setup:

  1. Create “Expense Requests”: “Employee”, “Amount”, “Category”, “Manager”, “Status”, “Approval Level”
  2. Add various expense requests with different amounts and categories

[IMAGE PLACEHOLDER: Tutorial 14 Setup - Expense Requests] Description: Screenshot of an expense request sheet with various amounts and categories Footer: Setting up a complex expense approval system

Steps:

  1. Create Primary Approval Automation

    • Name: “Expense Approval Workflow”
    • Use ”📝 Sheet Change” trigger for “Amount” column
  2. Set Up Complex Condition Groups

    • Use “Any condition can be met (OR)” logic
    • Group 1 (High Travel Expenses):
      • Amount > $5000 AND Category = “Travel”
    • Group 2 (Very High Any Expenses):
      • Amount > $10000 AND Category ≠ “Office Supplies”

[IMAGE PLACEHOLDER: Tutorial 14 Step 2 - Complex Conditions] Description: Screenshot showing multiple condition groups with AND/OR logic combinations Footer: Setting up complex conditional logic with multiple criteria groups

  1. Add Escalation Actions

    • Action 1: Update approval level to “Executive”
    • Action 2: Send email to CEO
    • Action 3: Add note to expense record
    • Action 4: Set status to “Pending Executive Approval”
  2. Create Secondary Automation for Auto-Approval

    • Handle smaller expenses with automatic approval
    • Different conditions and actions for streamlined processing

[IMAGE PLACEHOLDER: Tutorial 14 Step 4 - Escalation Result] Description: Screenshot showing an expense automatically escalated to executive approval with status updates Footer: Complex expense approval workflow showing automatic escalation


Tutorial 15: Dynamic Values and Advanced Placeholders

Goal: Create a comprehensive activity tracking system using all available dynamic placeholders and advanced data manipulation.

Setup:

  1. Create “Activity Log”: “Action”, “User”, “Timestamp”, “Cell”, “Old Value”, “New Value”, “Sheet”
  2. Create “Summary Dashboard”: “Date”, “Total Changes”, “Last Update”, “Most Active User”

[IMAGE PLACEHOLDER: Tutorial 15 Setup - Activity Tracking] Description: Screenshot showing both Activity Log and Summary Dashboard sheets set up Footer: Setting up comprehensive activity tracking with dashboard

Steps:

  1. Create Comprehensive Activity Tracker

    • Name: “Master Activity Logger”
    • Use ”📝 Sheet Change” trigger for entire spreadsheet
  2. Configure Advanced Activity Logging

    • Add ”➕ Add Row” action to Activity Log
    • Use advanced placeholders in row data:
    Edit,{{editing_user}},{{NOW}},{{EDITED_CELL}},{{OLD_VALUE}},{{EDITED_VALUE}},{{sheet_name}}
    

[IMAGE PLACEHOLDER: Tutorial 15 Step 2 - Advanced Placeholders] Description: Screenshot of the Add Row configuration showing all the dynamic placeholder variables Footer: Using advanced placeholders to capture complete edit information

  1. Create Dashboard Update Actions

    • Action 1: Update total changes count
    • Action 2: Update last modification time
    • Action 3: Update most active user (using formula)
  2. Add Scheduled Summary Action

    • Create second automation with ”⏰ Schedule” trigger
    • Daily summary email with dashboard statistics
    • Use placeholders like {{TODAY}}, {{FREQUENCY}}, {{TRIGGER_TIME}}

[IMAGE PLACEHOLDER: Tutorial 15 Step 4 - Dashboard Results] Description: Screenshot showing the populated activity log and updated dashboard with statistics Footer: Complete activity tracking system with real-time dashboard updates


Tutorial 16: Creating and Using Custom Workflow Templates

Goal: Create reusable automation templates for common business processes.

Setup:

  1. Design a standardized business process (e.g., customer onboarding)
  2. Create a template structure that can be easily customized

[IMAGE PLACEHOLDER: Tutorial 16 Setup - Template Design] Description: Screenshot showing a well-structured customer onboarding sheet ready for template creation Footer: Designing a standardized process suitable for template creation

Steps:

  1. Access Template Gallery
    • Click ”➕ New Automation”
    • Browse existing templates in the gallery
    • Notice template categories and descriptions

[IMAGE PLACEHOLDER: Tutorial 16 Step 1 - Template Gallery] Description: Screenshot of the template selection screen showing various pre-built templates organized by category Footer: Exploring the built-in template gallery with categorized options

  1. Use Template as Starting Point
    • Select “Task Completion Tracker” template
    • Click “Use This Template”
    • Customize the automation name and settings

[IMAGE PLACEHOLDER: Tutorial 16 Step 2 - Template Customization] Description: Screenshot showing template customization dialog with options to modify name and basic settings Footer: Customizing a template for your specific use case

  1. Modify Template Components
    • Adjust trigger settings for your sheet structure
    • Modify conditions to match your criteria
    • Customize actions for your workflow needs
    • Update dynamic placeholders and formulas

[IMAGE PLACEHOLDER: Tutorial 16 Step 3 - Template Modification] Description: Screenshot showing the template being edited with custom trigger, conditions, and actions Footer: Modifying template components to fit specific business requirements

  1. Save as Custom Template (Advanced)
    • After perfecting your automation, save it as a template
    • Document the customizable elements
    • Share with team members for consistent processes

[IMAGE PLACEHOLDER: Tutorial 16 Step 4 - Custom Template] Description: Screenshot of a completed custom automation that could serve as a template for others Footer: Creating reusable custom templates for standardized business processes

Tutorial Tips and Best Practices

General Best Practices

  1. Always Test First: Use sample data and test sheets before applying to important data
  2. Start Simple: Begin with basic automations and add complexity gradually
  3. Monitor Execution: Check the ”📊 Logs” tab regularly for automation execution status
  4. Use Descriptive Names: Make automation names clear and purpose-driven
  5. Document Your Logic: Use comments and clear descriptions for complex automations

[IMAGE PLACEHOLDER: Best Practices - Logs Tab] Description: Screenshot of the Logs tab showing automation execution history and status Footer: Monitoring automation execution through the logs interface

Common Pitfalls to Avoid

  1. Infinite Loops: Be careful when automations modify cells that trigger other automations
  2. Performance Issues: Avoid very frequent triggers on large datasets
  3. Permission Errors: Ensure email permissions are set up for email actions
  4. Data Loss: Always backup important data before testing deletion actions
  5. Condition Conflicts: Ensure condition logic (AND/OR) matches your intended behavior

[IMAGE PLACEHOLDER: Pitfalls - Permission Setup] Description: Screenshot showing the email permission setup process to avoid permission errors Footer: Setting up proper permissions to avoid common automation failures

Advanced Tips

  1. Condition Chaining: Use multiple automations for complex decision trees
  2. Error Handling: Monitor logs and create backup processes for critical automations
  3. Performance Optimization: Use specific cell ranges instead of monitoring entire sheets
  4. Integration Testing: Test webhook and API integrations thoroughly before going live
  5. Template Strategy: Create reusable templates for common business processes

[IMAGE PLACEHOLDER: Advanced Tips - Condition Logic] Description: Screenshot showing the condition logic toggle options (All/Any) for complex decision making Footer: Using advanced condition logic for sophisticated automation workflows

Troubleshooting Guide

Common Issues and Solutions:

  1. Automation Not Triggering: Check trigger configuration and ensure sheet/range is correct
  2. Email Not Sending: Verify email permissions are set up properly
  3. Wrong Data in Actions: Check dynamic placeholder syntax and column references
  4. Performance Problems: Reduce trigger frequency or narrow monitoring ranges
  5. Condition Not Working: Verify condition values match actual data format

[IMAGE PLACEHOLDER: Troubleshooting - Debug Interface] Description: Screenshot showing automation configuration with highlighted areas for common troubleshooting checks Footer: Key areas to check when troubleshooting automation issues